Upgrade a Circline fluorescent lamp
While sitting at my desk I noticed a humming sound from the floorboards underneath my chair: it was the circular fluorescent light in the room below. The ballast unit in the ceiling light was buzzing and this could be heard downstairs as well as in the room above. I also had the nagging problem of the fluorescent light strobing several times, with several seconds of darkness before finally starting up. This had become a nuisance over the years, so much so that people would stumble around in the dark, which had caused at least one injury accident.
Upgrading the lamp is one answer but sometimes it’s not feasible or practical just to replace light fittings with modern halogen downlighters or LED bulbs, and if anything it can be a costly and wasteful exercise especially if it’s just in a utility room or cellar. I found circular fluorescent lamp fixtures are all but obsolete now, as everyone is switching to downlighters. Instead of raving around making big holes in the ceiling and trying to run wires everywhere, there is also the likely cost and payback time for an upgrade. As a long term proposition, LED bulbs or maybe CFLs are the way to go, and (thanks to the EU) halogen bulbs themselves are already being phased out. Until then I wanted to get a bit more life out of the circular light fitting, and as long as I can get new tubes I’m happy to do that.
Fluorescent tube apart, instead of struggling with old 1960’s tech, it’s straightforward to give a Circline circular light a new lease of life by upgrading the old-fashioned, noisy electrical gear with an electronic unit instead. They are cheap enough, very small and lightweight in comparison with a traditional ballast, and are rated up to 40W maximum (hence the 0.19 amps rating). So a 40W-rated electronic unit will be fine for my 32W tube. The other key benefit is that electronic ballasts are instant-on, with no flashing or buzzing, although you might have to accept a slightly lower light output (say 10% reduction).
DIY Instructions to upgrade a Circline circular fluorescent light
Any DIYer can install an electronic ballast and upgrade a typical 32W or 40W Circline circular fluorescent light unit. My own light unit had two wall switches and was an Italian-made lamp marketed by Ring in the UK, probably 15 years+ old and it’s likely that the wiring for yours will be no more complicated than mine, and possibly simpler.
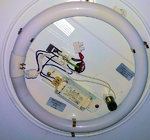 Original Circline lamp fixture and wiring [click to see]
First, it’s essential to switch off the lighting circuit at the fusebox and double check that everything is isolated before doing (or touching) anything: ideally use a contactless mains detector on the light’s wiring if you have one. That’s because some light circuitry wiring can be permanently live. Switching off the light switch(es) isn’t good enough. So make sure you either pull the fuse or switch off the circuit breaker and double check that it’s all turned off, using a tester if possible. I found neon screwdriver mains checkers tripped the circuit breakers due to leakage current, but the contactless C&K type with LED and beeper that I used was fine.
 Testing to ensure the mains is switched off [click to see]It’s a good idea to photograph the lamp’s wiring using a smartphone for reference. With the mains isolated, look closely at the existing wiring and identify the mains Live (L), Neutral (N) and Earth (E) feeds that probably go to a screw terminal block. Multiple wires might go into one terminal and several live wires might be joined together (part of the ring mains wiring) which should not be altered.
 Old fluorescent light wiring [click to see]Live wires going into the terminal block might be brown or more probably black with a red sleeve. This live wire must not be confused with an ordinary black (Neutral) wire.
- As shown in my photo, there was a fault with my existing wiring: the red sleeve was missing, but the black wire is LIVE INPUT. I added a red sleeve straight away.
Unplug the fluorescent tube by pulling off the 4-pin plug and put the tube aside for now. You can then unscrew the terminal block screws to loosen the mains L, N, E input wires. As the existing push-fit/ screw terminal block could not be re-used I fitted a new one. Then re-wire L, N and E inputs to the new block.
The terminal block might need unscrewing from the metal baseplate. Also remove the starter (the small cylinder with two wires). It rotates and pulls off, then prise the base off the light unit. The old ballast unit can then be unscrewed (it’s heavy) and the whole assembly should come away.
The new electronic ballast is much smaller and lighter and can be fitted to the metal base using one screw from the old ballast (do not overtighten). The unit’s Live (red) and Neutral (white) wires can be connected to the L & N feeds of the (new) screw terminal block.
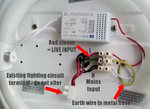 New electronic ballast wired, with new terminal block and earth wire [click to see]It is essential that the lamp remains properly earthed after the upgrade. Earth wires are usually bare copper, and should be sleeved with green & yellow tubing. I clamped a solid, sleeved earth wire under the mounting screw of the old terminal block screwed onto the light fitting’s metal base, and connected the wire to the Earth terminal of the new screw terminal block. Thus the light fitting’s metal base was earthed properly.
Refit the fluorescent tube and connect up the new electronic inverter. Shuffle the tube around if the connector doesn’t quite reach. Fit the lamp diffuser and switch on the mains – you’ll find the lamp will now light instantly with none of the fuss and bother of the old unit.
 Tube running with new electronic ballast [click to see]I intend to do the same with a kitchen lamp too. Here’s a suitable electronic ballast, and as they’re so cheap maybe keep one for spare. A good quality C&K non-contact tester (T2272A) is also shown. It has red-green LED and audible buzzer indication of live wires, without needing to touch them directly.

 Alan W
40W Electronic Ballast - Labelling Oddity
I’ve received more JL-EB40Y electronic ballasts and so I decided to peek inside one. The quality is typical of much low-price Chinese-made electronics of this type. I’d prefer something more robust, but I’ve seen far worse and in my view it’s alright for repairing a domestic ceiling light unit or a round fluorescent mirror light. Besides, the soldering is good quality and it’s well finished off but I don’t expect the device will last for ever.
However a minor discrepancy arose when I dug deeper. The product label implies that the upper (mains input) wire is Live and the lower one is Neutral. OK so far...
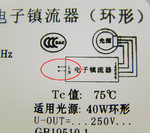 Label shows Live and Neutral wires, top and bottom [click to see]Comparing six samples, I found the red and white mains input leads are wired into the device either way round! E.g. my Homebase round mirror unit has the red wire at the top which I took to be the mains Live in (per the label), and white wire (neutral) at the bottom. Another sample also had the same colours.
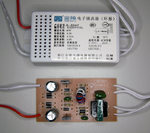 According to the product label, the sample top has Red as Live (?) but the sample below has White as Live [click to see]
However four more samples had white wires at the top and red at the bottom for Live and Neutral inputs. Which is correct?
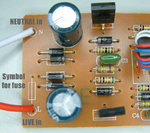 Circuit board shows Live is the BOTTOM wire, and has a fuse [click to see]Looking at the circuit board inside, it doesn’t make any difference to operation whichever way round it’s wired up. The a.c. circuit is symmetrical and the only difference I found was that a primitive internal fuse is embedded in the Live on the circuit board’s copper track pattern. In general, Live should always be the fused feed, so the rest of the circuit gets disconnected from the mains if the fuse fails.
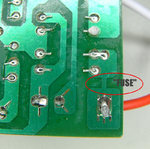 Basic fuselink in the circuit board's Live feed [click to see]Unfortunately, this means the unit’s label does not tally with the Live and Neutral connections soldered to the circuit board, where Neutral is at the top and Live (fused) is at the bottom of the board instead.
Bottom line is, when installing one, you could choose to ignore the wiring colours and it’s marginally better to ensure the upper wire is Neutral mains input and the lower one is Live mains input which is fused in a primitive way.
I have no reason to think that this budget Chinese ballast would cause a problem whichever way round it’s wired. So I’m leaving things as they are (and besides, the house circuit breakers are very responsive anyway: a mere popping light bulb trips them frequently). Most other similar units make no distinction at all about polarity, nor do they specify the wattage (22, 32, 40W) either. They're a one size fits all device.
One thing I will do, though, is to superglue the ventilated covers to the plastic base to stop them being pulled apart. And always ensure the light fixture is properly earthed.

 Alan W
Homebase Circular Mirror pull switch repair
Sure enough, one evening the lamp suddenly refused to turn off as the switch had jammed. It’s five years old and the mechanism doesn’t last forever, but suitable spare parts are thin on the ground. However it’s straightforward enough to swap the switch and below I describe a suitable replacement along with some DIY notes.
As some of the mains wiring could be permanently live, before doing any work the light’s mains supply must be switched off at the fusebox, so find the circuit breaker and switch it off or pull the fuse. The mirror can then be taken off, and the lid removed from the plastic box inside. The switch can easily be unscrewed and removed. The new one is a straight swap, and it doesn’t matter which way round the two mains wires go into it.
 New switch in place [click to see]The pull cord supplied with the new switch probably isn’t long enough and if unless you re-use the old cord & knob you’ll need approx 45cm of 1.5mm nylon cord (available on eBay, for example). Seal the ends with eg a cigarette lighter flame to stop them fraying. Make sure the switch works smoothly and the moving parts don’t jam against any wiring etc, then replace the lid. Reposition the black rubber seal around the edge of the mirror and then the glass mirror can be replaced. Turn on at the mains and test. Done!
This is a typical replacement pull switch available from Amazon: https://amzn.to/4ahPmw3
The above Amazon Affiliate links help towards the annual cost of this web site, which runs at a loss.


